Photographing falling balls with Fischertechnik.

Fussballroboter, Autofabrik...
Modellideas &- presentation - Soccerrobot, Carfactory...
Forumsregeln
Bitte beachte die Forumsregeln!
Antworten
fotoopa
Beiträge: 312
Registriert: 05 Okt 2017, 11:44
Wohnort: Belgie
Kontaktdaten:

Photographing falling balls with Fischertechnik.

Beitrag von fotoopa » 05 Mai 2020, 19:07

Photographing falling balls. Setup is done with Fischer technik building blocks. The ball is directed into a funnel tube. The internal diameter is just a little bit larger than the ball. This is important so that the ball comes down nicely uniformly. Slightly below the exhaust tube is an optical detector. The detector sends a signal to the FPGA in which the camera and flash controls are located. Controlling this directly from the Fischer TXT controller would be too slow. The TXT controller is ideal for transmitting the desired parameters via I2C. This way you can set the flash delay from the sensor. The bigger this delay is, the deeper the ball will fall. To get an idea of this speed a ruler with a range of 200 mm has been applied. The camera must be controlled according to a correct protocol. The mirror has to be flipped up in advance and you have to take into account the time it takes for the camera to start recording (shutter delay). For the Nikon D7100 this time is 53 msec. The camera is in manual mode, bulb, and the flash window starts after this shutter delay. The flash works in TTL mode. This makes it possible to set the flash time via the TXT controller. The flash works with 2 signals, an X signal starts the flash, a Q signal stops the flash. I now use 400 usec as flash duration. The shorter you can hold this signal, the sharper the image becomes. This is because the exposure time on the ball is very short compared to the travel. Because all these signals are small times it is best to control this via a micro controller or FPGA.
The program includes a setting for the number of images that can be taken, the start delay time and the increase of the delay after each shot. Thus, the depth at which the ball falls will get bigger and bigger.

A few pictures:
Bild
On Flickr: https://www.flickr.com/photos/fotoopa_hs/49859710667

Bild
On flickr: https://www.flickr.com/photos/fotoopa_hs/49859400216

Bild
On Flickr: https://www.flickr.com/photos/fotoopa_hs/49859400501

I also have a short video:
Flickr: https://www.flickr.com/photos/fotoopa_hs/49859423156

Frans.

Benutzeravatar
steffalk
ft:pedia-Herausgeber
Beiträge: 1794
Registriert: 01 Nov 2010, 16:41
Wohnort: Karlsruhe
Kontaktdaten:

Re: Photographing falling balls with Fischertechnik.

Beitrag von steffalk » 05 Mai 2020, 21:56

Hello Fotoopa,

WHAT a project! Amazing!

Best Regards,
Stefan

ModeratorRalf
Moderator
Beiträge: 163
Registriert: 13 Sep 2019, 21:00

Re: Photographing falling balls with Fischertechnik.

Beitrag von ModeratorRalf » 05 Mai 2020, 23:09

Da liefert Deepl doch gerne mal eine Übersetzung. Bis auf das µ (was ja vorher schon ein u war) habe ich da wirklich nichts geändert - unglaublich:
--------------------
Fotografieren fallender Bälle. Der Aufbau erfolgt mit Fischer-Technik-Bausteinen. Die Kugel wird in ein Trichterrohr geleitet. Der Innendurchmesser ist nur ein wenig größer als die Kugel. Dies ist wichtig, damit der Ball schön gleichmäßig nach unten fällt. Etwas unterhalb des Trichterrohrs befindet sich ein optischer Detektor. Der Detektor sendet ein Signal an den FPGA, in dem sich die Kamera- und Blitzsteuerung befindet. Dies direkt vom Fischer TXT-Controller aus zu steuern, wäre zu langsam. Der TXT-Controller ist ideal für die Übertragung der gewünschten Parameter über I2C. Auf diese Weise können Sie die Blitzverzögerung vom Sensor aus einstellen. Je größer diese Verzögerung ist, desto tiefer wird die Kugel fallen. Um eine Vorstellung von dieser Geschwindigkeit zu bekommen, wurde ein Lineal mit einem Bereich von 200 mm verwendet. Die Kamera muss nach einem korrekten Protokoll gesteuert werden. Der Spiegel muss im Voraus hochgeklappt werden und man muss die Zeit berücksichtigen, die die Kamera braucht, um mit der Aufnahme zu beginnen (Auslöseverzögerung). Bei der Nikon D7100 beträgt diese Zeit 53 msec. Die Kamera befindet sich im manuellen Modus, Glühbirne, und das Blitzfenster startet nach dieser Auslöseverzögerung. Der Blitz arbeitet im TTL-Modus. Dadurch ist es möglich, die Blitzzeit über den TXT-Controller einzustellen. Der Blitz arbeitet mit 2 Signalen, ein X-Signal startet den Blitz, ein Q-Signal stoppt den Blitz. Ich verwende jetzt 400 µsec als Blitzdauer. Je kürzer man dieses Signal halten kann, desto schärfer wird das Bild. Das liegt daran, dass die Belichtungszeit auf der Kugel im Vergleich zum Verfahrweg sehr kurz ist. Da alle diese Signale kleine Zeiten sind, ist es am besten, dies über einen Mikrocontroller oder FPGA zu steuern.
Das Programm enthält eine Einstellung für die Anzahl der Bilder, die aufgenommen werden können, die Startverzögerungszeit und die Erhöhung der Verzögerung nach jeder Aufnahme. Dadurch wird die Tiefe, in die der Ball fällt, immer größer und größer.
--------------------
Übersetzt mit www.DeepL.com/Translator (kostenlose Version)

@fotoopa: Wieder mal ein unglaublich tolles Projekt! Once again an incredible great project!

LG, Ralf
Nordconvention am 20. April 2024 im Schulzentrum Mellendorf in 30900 Wedemark

fotoopa
Beiträge: 312
Registriert: 05 Okt 2017, 11:44
Wohnort: Belgie
Kontaktdaten:

Re: Photographing falling balls with Fischertechnik.

Beitrag von fotoopa » 06 Mai 2020, 09:01

Thanks Stefan and Ralf!
Thanks also for the translation. I can't post them because I couldn't guarantee the correctness. My German language knowledge is insufficient for this.

In addition, I have a small task for the mathematicians:

Bild
On Flickr: https://www.flickr.com/photos/fotoopa_hs/49862363512

What is the speed at position 90mm.
What is the speed at position 180mm and what delay is needed?
The picture shows some extra reference values that can help you.
You may use the theoretical acceleration for falling objects.

I can measure the result afterwards to see if the calculations are correct! Would you also like to indicate how you make the calculations.

Frans.

Benutzeravatar
steffalk
ft:pedia-Herausgeber
Beiträge: 1794
Registriert: 01 Nov 2010, 16:41
Wohnort: Karlsruhe
Kontaktdaten:

Re: Photographing falling balls with Fischertechnik.

Beitrag von steffalk » 06 Mai 2020, 10:40

Hello Fotoopa,

(Are you aware that the term "Foto" means photo and "Opa" means "Grandfather" in German? I think this led many people including me to believe you are German ;-) )

If we dismiss air friction (and we may if these are small steel balls falling just a few cm), the speed from height can be calculated as v = sqrt(2gh) with v being the speed in m/s, g being the earths gravity acceleration = 9,81 m/s² and h being the height, in m. Don't confuse the units.

As the fall's height h=gt²/2, time t = sqrt(2h/g) with t in seconds and h again in meters.

Regards,
Stefan

fotoopa
Beiträge: 312
Registriert: 05 Okt 2017, 11:44
Wohnort: Belgie
Kontaktdaten:

Re: Photographing falling balls with Fischertechnik.

Beitrag von fotoopa » 06 Mai 2020, 11:05

Thanks Stefan.
Thanks for the formula. It's been 62 years since I had to learn it in school!

A new test:
Dropping a ball on a stretched wire.

Bild
Flickr: https://www.flickr.com/photos/fotoopa_hs/49862313976

The accuracy is so high that even from my first test the result was correct. If you need to adjust the time a little, you can make the ball come a little higher or lower.

Frans.

fotoopa
Beiträge: 312
Registriert: 05 Okt 2017, 11:44
Wohnort: Belgie
Kontaktdaten:

Re: Photographing falling balls with Fischertechnik.

Beitrag von fotoopa » 06 Mai 2020, 16:23

Here a new test with soap bubble and balls:

Bild
Flickr HD picture: https://www.flickr.com/photos/fotoopa_hs/49863086656

Through the Robopro program and the TXT controller, these recordings can be made quickly and accurately. Setting the times to get the ball at the right height is just dragging the delay slider a bit. The Robopro program then ensures that the ball is supplied. In order to have no vibrations during the fall of the ball, the chain motor is stopped beforehand.The servo brought the ball into the funnel. The rest is just detection and timing.
The green block where the ball falls in is quickly created via 3D printing.

Benutzeravatar
steffalk
ft:pedia-Herausgeber
Beiträge: 1794
Registriert: 01 Nov 2010, 16:41
Wohnort: Karlsruhe
Kontaktdaten:

Re: Photographing falling balls with Fischertechnik.

Beitrag von steffalk » 06 Mai 2020, 17:19

Hello Fotoopa,

One word: Wow. Unbelieveable.

Best Regards,
Stefan

fotoopa
Beiträge: 312
Registriert: 05 Okt 2017, 11:44
Wohnort: Belgie
Kontaktdaten:

Re: Photographing falling balls with Fischertechnik.

Beitrag von fotoopa » 07 Mai 2020, 20:03

Thanks Stefan!

Now I have a new picture with Balls on the seesaw!:

Bild
HD on Flickr: https://www.flickr.com/photos/fotoopa_hs/49867388426

Here you can see the raction of the left ball caused by a ball falling on the right side. The falling ball is already jumping back up a bit. The picture however shows a lot of other details. Because the camera was open for about 250 msec before the real flash, some ambient light came in. The start contour position shows those lines. The left side shows as if there is a bell above but this is not so, it is the left ball in the lower position that is waiting.
The left ball has also gone higher than the current image. This can also be seen as a slight reflection indicated by max hight. All these light reflections can be checked if you also take the recording times of the camera. Technically, this image contains a lot of extra information that you would not see at first glance.

Frans

fotoopa
Beiträge: 312
Registriert: 05 Okt 2017, 11:44
Wohnort: Belgie
Kontaktdaten:

Re: Photographing falling balls with Fischertechnik.

Beitrag von fotoopa » 08 Mai 2020, 19:20

Today a new test with multiple flashes on the falling ball.

Bild
HD on Flickr: https://www.flickr.com/photos/fotoopa_hs/49871265107

This picture shows an image where 3 times is flashed. There is some ambient light present so the trace that the ball makes is slightly visible. The falling ball was flashed 100 msec after the detector above. The two consecutive flashes are each 60 msec later. The flash duration is 160 usec each time.
Because the flash is on the camera and the ambient light comes from above, the moving path and flash point on the ball are slightly apart.
The control program is done with the TXT controller and the Robopro software. The camera parameters are sent via I2C to the FPGA where camera and flash are controlled. The ball is applied via Fischertechnique and a servo that drops the ball into the funnel.

The user settings are done via the TXT controller:
See on Flickr: https://www.flickr.com/photos/fotoopa_hs/49870958461
That's where I can set all the parameters.

Frans.

Benutzeravatar
PHabermehl
Beiträge: 2434
Registriert: 20 Dez 2014, 22:59
Wohnort: Bad Hersfeld

Re: Photographing falling balls with Fischertechnik.

Beitrag von PHabermehl » 08 Mai 2020, 20:40

Not much to say. Truely amazing.

Best regards
Peter
https://www.MINTronics.de -- der ftDuino & TX-Pi Shop!

viele Grüße
Peter

fotoopa
Beiträge: 312
Registriert: 05 Okt 2017, 11:44
Wohnort: Belgie
Kontaktdaten:

Re: Photographing falling balls with Fischertechnik.

Beitrag von fotoopa » 09 Mai 2020, 14:19

Thanks Peter,
These are all small tests as an exercise on the FT project with falling balls.

Today a new test:

High speed test, ball falls through soap bubble on the trampoline.
Due to the high speed of fall, the ball goes straight through the soap bubble without damaging it. The ball sinks deep into the trampoline to later rebound and fly through the soap bubble again.
You can also clearly see the trace the ball leaves during the fall as a light strip.

Bild
HD picture Flickr: https://www.flickr.com/photos/fotoopa_hs/49873327368

I couldn't use a second flash sequence here because the ball flies up too fast and my minimum repeat time is 45 ms. This would be prefectly solvable with power leds as flash. I urgently need to order some 20W leds and make a 3D housing for it. I'm sure the LED flash will be here soon...

You can also add pearls and photograph them together with the falling ball. Also here the ball is already bouncing back.
Bild
HD on Flickr: https://www.flickr.com/photos/fotoopa_hs/49874704887


Frans.

fotoopa
Beiträge: 312
Registriert: 05 Okt 2017, 11:44
Wohnort: Belgie
Kontaktdaten:

Re: Photographing falling balls with Fischertechnik.

Beitrag von fotoopa » 12 Mai 2020, 18:48

As promised, I have an LED flash connected.
Bild
HD on Flickr: https://www.flickr.com/photos/fotoopa_hs/49886915696

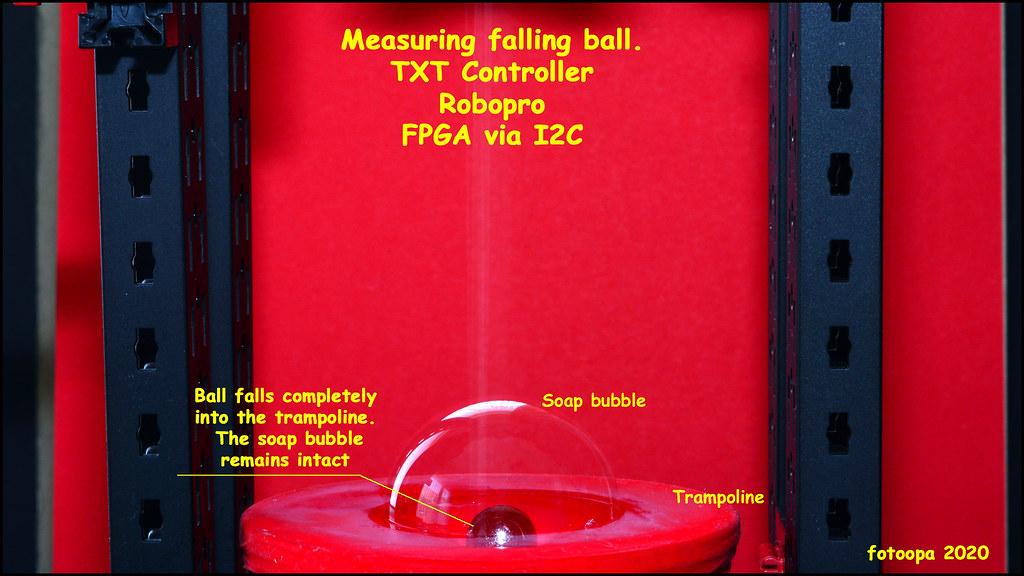
The TXT controller of Fischertechnik controls the whole thing. The program used is the Robopro. The motor that brings the balls is controlled by the TXT, the camera is controlled by the FPGA. The necessary parameters are transferred via I2C. On the PC everything is nicely adjustable and controllable.
The camera is the Nikon D7100 and together with the software ControlMyNikon, the images are transferred directly to the PC where they can be seen online in full resolution. I use 2 UHD screens next to each other, one screen shows your settings of Robopro TXT, the other ControlMyNikon with all camera settings and the incoming image.

The resultat:
Bild
HD Flickr: https://www.flickr.com/photos/fotoopa_hs/49887229407

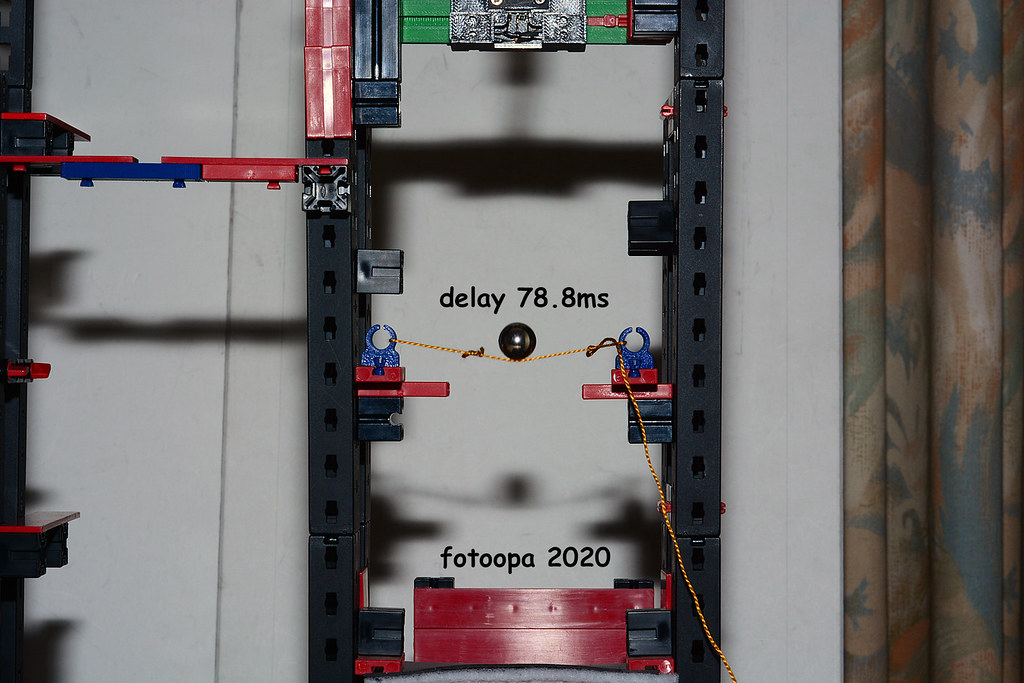
This picture contains a lot of information if you take into account the supplied data. The contrast of the balls is a bit lower because your 4 X flash is within the same image. The first ball you see has already covered a distance of almost 110 msec. This time is adjustable in the Robopro program. The higher this time the deeper the ball will be visible in the picture. A flash repeat is performed 3 times with a delay of 8.2 msec each time. The flash time is 60 usec each time. Because the ball accelerates during the fall you can clearly see that the distance between the first flash and the next flashes is different. At the last flash, the ball is already bouncing back through the trampoline As a result, the distance between flash3 and flash4 has just decreased You can also see that the ball has just sunk into the trampoline at flash4 So you can see that with these kinds of shots a lot of phenomena can be explained.

I also took a screen shot of my 2 UHD screens:
Link to Flickr very high resolution image: https://www.flickr.com/photos/fotoopa_hs/49886915626

On Flickr, however, you can zoom in and shift the image. This is a screen dump of my 2 UDH screens together, resulting in a total image of 7680x2160 pixels. Here I have a realtime overview of the running programs. I see the settings and the live images coming in in real time.
The PC is a Win10 system I9 at 3.6GHz 32Gb ram and 5TB of SSD memory. The TXT Controller and the D7100 camera are connected via USB for real-time data transfer. This picture is quite large considering the original data.

These tests provide a lot of information. That is also the purpose of my tests. All these tests require some knowledge in many areas, such as photography, mechanics, physics, electronics, programming, lighting, etc. This is precisely the pleasant thing to experiment with.

Frans.

Benutzeravatar
steffalk
ft:pedia-Herausgeber
Beiträge: 1794
Registriert: 01 Nov 2010, 16:41
Wohnort: Karlsruhe
Kontaktdaten:

Re: Photographing falling balls with Fischertechnik.

Beitrag von steffalk » 12 Mai 2020, 19:48

Hello Fotoopa,

this is all sooo fantastic! I hope I do not offend, but I *beg* you to reconsider if you might want to publish an ft:pedia article about this. Please be assured that you get all the help that you want or need in writing, formatting, drawing, you name it. You can just concentrate on your experiment and provide photos and a raw text, we will be happy to refine everything until you are satisfied. The community will thank you, that's for sure.

All the best to you,
Stefan

fotoopa
Beiträge: 312
Registriert: 05 Okt 2017, 11:44
Wohnort: Belgie
Kontaktdaten:

Re: Photographing falling balls with Fischertechnik.

Beitrag von fotoopa » 13 Mai 2020, 09:28

Hello Stefan,

I'd like to think about writing something anyway. Especially the experiments I would like to describe with pictures. The original text would then be in Dutch. Just let me have some time, there's a good chance something will be done.

Frans.

fotoopa
Beiträge: 312
Registriert: 05 Okt 2017, 11:44
Wohnort: Belgie
Kontaktdaten:

Re: Photographing falling balls with Fischertechnik.

Beitrag von fotoopa » 13 Mai 2020, 19:32

Today a new test:
Setup to measure the speed of an XM motor. A yellow marker is used as a reference. An IR sensor detects the rotating marker and gives a signal to control the flashes. The led flash contains 4 power LEDs each 100W. The used flash time is 140 usec each.

Bild
HD picture on Flickr: https://www.flickr.com/photos/fotoopa_hs/49890669478

Bild
HD picture on Flickr: https://www.flickr.com/photos/fotoopa_hs/49890669508

An IR sensor detects the rotating marker and gives a signal to control the flashes. First a delay of 27.8 msec occurs so that the marker is just vertical at the first flash. This is followed by 2 more flashes each time with a delay of 29.0 msec. These give an image horizontally to the right and vertically below. A full turn corresponds to 4 x this time of 29 msec or 116 msec. So the motor runs at 1000/116*60= 517 tr/min. This is the unloaded number of revolutions which is higher than the given nominal speed under a normal load.

When checking with a scope on the pulses from the IR sensor, I get to the same value. A scope goes faster and is even more accurate but this is a flash exercise.

Frans.

fotoopa
Beiträge: 312
Registriert: 05 Okt 2017, 11:44
Wohnort: Belgie
Kontaktdaten:

Re: Photographing falling balls with Fischertechnik.

Beitrag von fotoopa » 14 Mai 2020, 19:23

Today again a new test:

Speed test 3 objects.
The green objects are 3D printed, Left fully plastic, central internally 8mm steel and full right a steel ball. The weight is different and so is the shape. With this test I wanted to know if the fall speed would differ. The difference can be seen on the picture. The steel ball is very consant in several tests, the 3D printed versions differ quite a bit with the left, even the smallest weight, falling less stable. Sometimes it falls oblique, but the heavier ones have a much more stable result and keep their vertical position better. The images were recorded under the same conditions, same exposure and delay from the detector sensor. The delay from the detector was 120 msec. Flash time 300 usec. Camera Nikon D7100, Macro 60mm lens F16. Fischer TXT-Controller with Robopro and I2C connected to the FPGA hardware for camera control.
Bild
HD picture Flickr: https://www.flickr.com/photos/fotoopa_hs/49894790146

This will probably be my last test in this series. I'm now trying to write an article on how I perform all my tests with an overview of the hardware and software. This may take a while. I would also like to make drawings to clarify the whole thing.

Frans.

Benutzeravatar
steffalk
ft:pedia-Herausgeber
Beiträge: 1794
Registriert: 01 Nov 2010, 16:41
Wohnort: Karlsruhe
Kontaktdaten:

Re: Photographing falling balls with Fischertechnik.

Beitrag von steffalk » 14 Mai 2020, 21:55

Hello everybody,

Your last test is, as the former ones, just formidable. I can only repeat how fine all this was made. Congratulations and all the best whishes.

Stefan

Jan3D
Beiträge: 64
Registriert: 07 Nov 2019, 13:33

Re: Photographing falling balls with Fischertechnik.

Beitrag von Jan3D » 24 Mai 2020, 17:44

While I'm at it, I'm also moving this thread and it's amazing content to another subforum.

Dt: in passenderes Subforum verschoben.

Jan
Moderator in den Foren "Tipps und Tricks" und "3D Druck"

Antworten